
[ad_1]
A complete hiking guide for the 28 km trek to Trolltunga, covering every detail for reaching the iconic Troll’s Tongue viewpoint in Norway.
Although not the easiest, Trolltunga is one of the most popular hikes in Norway. The main draw for many is the iconic photo opportunity on the famed Troll’s Tongue, a dramatic slice of rock extending over Lake Ringedalsvatnet at an altitude of 1,180 meters above sea level!
After hiking to Preikestolen and Kjeragbolten, I have to say that Trolltunga is my personal favorite hike in Norway– and not just for the chance to stand on the admittedly epic rock formation.
This trail is slightly more challenging and makes for a fun day of exploring the high mountains with excellent views of the lakes and iconic Norwegian landscapes.
Trolltunga Hike Details
When I was passing through Odda on my bicycle trip across Norway, I found the information online slightly outdated and confusing. That’s why I’ve created this guide, to help other travelers and explorers plan an adventure to Trolltunga.
Here’s what you need to know:
- Hiking Distance: 28 km round-trip (17.4 miles)
- Duration: Recommended: 10-12 hours. I took roughly 9.5 hours with 30 minutes at the Trolltunga cliff viewpoint
- Elevation Gain: 800 meters (2,625 ft)
- Trolltunga height: 1,180 meters above sea level
- Difficulty: A decently challenging hike with steep climbs. Automatically rated as “expert” since it is longer than 20 km.
- Navigation: The trail is well-marked but having a GPS or a map is advisable
- Starting Point: Small town of Skjeggedal via Tyssedal, called the P2 car park– accessible by car, tour, or shuttle bus from Odda.
- Hiking season: 1 June to 31 August independent hiking is permitted. In Winter (from 1 October to 31 May) a hiking guide is compulsory.
- More info: Full route & hiking details from my hike on My Strava
This information covers the main, official, and recommended P2 route from Skjeggedal that I took.
However, you can also hike P3 at Mågelitopp which makes it a 20-kilometer out-and-back hike with about 320 meters of elevation gain over 7-10 hours (more info below).
While there is another car park (P1 in Tyssedal), I wouldn’t recommend trying to hike from here because this would be very long (around 38 km with over 2,000 m elevation gain). And, you’d need to walk up the winding Skjeggedalsvegen road which isn’t very safe for pedestrians.
Whichever route you take, you’ll be hiking along the western edge of the Hardangervidda mountain plateau along very steep cliffs overlooking a deep valley carved by an icecap during the ice ages. This follows a mix of rough terrain and rocky sections in Norway’s high mountain region so come prepared.
The views throughout the hike are incredible and in my opinion, well worth the challenge and the potential crowds.

How to Get to the Trolltunga Starting Point
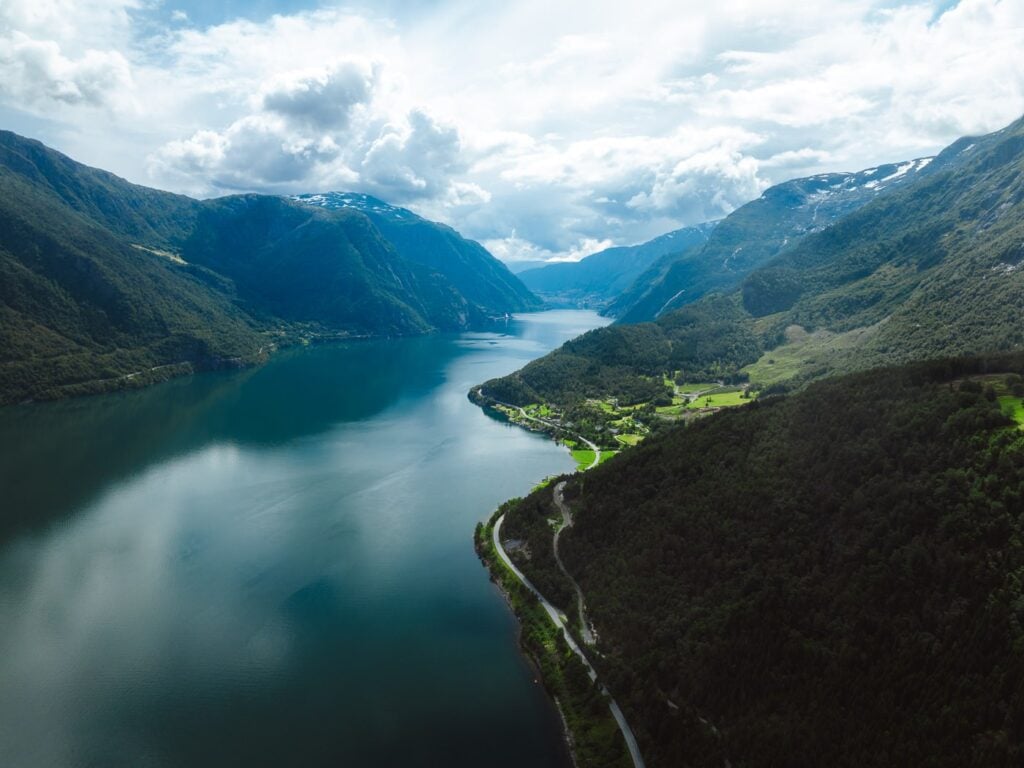
The Trolltunga hike is located in the Vestland region near the famous Hardangerfjord, the second-longest fjord in Norway. The closest major town is called Odda and I recommend making a plan to get here first.
The town of Odda is quite far from the popular tourist cities of Norway, meaning you’ll need to plan ahead to get here.
Below is a useful table that summarizes the best transport options to Odda from cities in Norway. If you are driving yourself, you may need to take some vehicle ferries depending on your route. So, plan ahead by checking times and availability per season.
| City | Distance to Trolltunga (km) | Travel Time Estimate (hours) | Transport |
|---|---|---|---|
| Oslo | 346 km | ~6 hours | Drive or train to Bergen (Bergensbanen) then bus to Odda |
| Bergen | 135 km | ~3 hours | Drive, bus, or full-day tour |
| Stavanger | 192 km | ~4 hours | Drive or NOR-WAY bus to Odda |
The closest airports to Odda are Haugesund (2.5 hours), Bergen (3 hours), Stavanger (4 hours), and Oslo Airport (6 hours).
Once you have reached Odda, you have four options to get to the start of the Trolltunga hike. These are:
- Booking an organized hiking tour with transport (usually from Odda) – My favorite is Trolltunga Active
- Arranging a shuttle bus service from Odda to P2 or P3 directly
- Driving the RV13 to Tysedal then the Skjeggedalsvegen to the P2 car park at Skjeggedal (25- 30 minutes)
- Taking the public bus (Skyss) to Tyssedal then the shuttle bus to the P2 car park at Skjeggedal
I’ll go into more detail about all of these options below. Otherwise, skip directly to the hiking guide.
Transport tip: We decided to stay in Odda for a night at Trolltunga Camping so that we could hike to Trolltunga early the following morning. We noticed that there were many travelers doing this and arranged to carpool with other travelers from the campground.
Option 1: Book an Organized Hiking Trip to Trolltunga
The easiest and most convenient option to get to Trolltunga is to simply book a guided tour. There are a few companies running trips to Trolltunga and most depart from Odda.
My favorite company and the one with the most positive reviews is Trolltunga Active. They run several tours all throughout the year, including easy morning tours, sunrise hikes, and overnight trips.
Do I Need a Hiking Guide?
Since it is not very clear whether or not you need a guide, I contacted Visit Norway and spoke to Anders from the official Norway tourism team.
He told me that you do not need a guide to hike to Trolltunga during the main hiking season (1 June to 31 August) or during the shoulder seasons. He mentioned that due to dangerous conditions, hiking with a guide is compulsory during the Winter Season(from 1 October to 31 May) but after pressing he admitted that this is not policed or enforced.

Option 2: Book a Shuttle Bus to Trolltunga Trailhead
The second most convenient option is to book the shuttle bus to the main trailhead at P2.
There are two main local companies running services to P2 trailhead from Odda (30 minutes), with options also available from Tyssedal (15 minutes). It’s best to book these ahead and to check the bus schedule since it changes depending on the season.
- Option 1: Trolltunga Shuttle – several stops in Odda
- Option 2: Fjord Tours – from the Odda Taxi Terminal
Optional: From the P2 parking lot, you can take a second shuttle all the way to P3 via “Trolltunga Stiga” to start further up the mountain.
Option 3: Drive to Trolltunga Starting Point From Odda
If you have your own car, then the best way to reach the trailhead is to drive directly to P2 parking lot for the main trailhead.
Driving Directions:
From Odda, you’ll want to take the RV13 (Tyssedalsvegen) on the eastern side of Hardangerfjord, passing through a long tunnel (no bicycles or pedestrian access in the tunnel) until you reach Tyssedal. This journey takes about 10 minutes.
Once you reach Tyssedal, you will take the winding mountain road called Skjeggedalsvegen all the way up to the P2 parking area. Here you can park your car for 500 NOK (includes the road toll fee of 200 NOK) and begin the hike. There are 180 spots available and you don’t need to prebook.
This road takes 15-20 minutes but is only suitable for cars 5.2 m or under. This means no campervans or buses.

Alternative Parking for Trolltunga
There is a lark car park at Tyssedal (called Trolltunga P1 car park) with 220 car spaces catering for vehicles not suitable to drive up Skjeggedalsvegen.
Parking costs 300 NOK for the day. From here you can take a shuttle bus to P2 or P3 (see above).
If you want to start the Trolltunga hike from the P3 Mågelitopp car park, you can continue driving up the mountain to this small car park for another 10-15 minutes (max vehicle height 2 m). However, this is a private parking lot with only 30 parking spaces and unlike P1 and P2, you must book P3 Upper Parking Lot in advance for 600 NOK. You must also pay an additional 200 NOK road toll, making this the most expensive option.
Self-drive tip: I recommend driving to the main P2 car park very early to make sure that you get a spot. While there is plenty of space for cars, it can fill up in the peak summer season and it’s first-come, first-serve. Additionally, to get to Trolltunga first and avoid the queues, aim to arrive at P2 by 6 am and then take the shuttle at 6:15 am for 150 NOK to the P3 car park to get a head start.
Option 4: Public Transport to Tyssedal
There are public transportation buses to Tyssedal from Odda which often is much cheaper than the shuttle bus.
This is the 995 line and departs from Odda Busstasjon towards Skogly and get off at Tyssedal Rutebilstasjon which is close to the P1 car park for Trolltunga.
Check the timetable on the Skyss Website. Note that it changes seasonally.
The journey takes about 20 minutes, more or less and costs 40 NOK, which means it’s the cheapest way to get to Tyssedal from Odda if you don’t have your own car.
However, you’d then need to arrange a shuttle bus from Tyssedal to P2 or P3 to begin the hike.

My Experience Hiking to Trolltunga
With the lengthy logistics out of the way, let’s dive into what to actually expect on the Trolltunga hike. I’ll detail my recent experience hiking to Trolltunga for the first time to help you understand exactly what to expect from this amazing hike.
Finding the Trolltunga Trailhead from the P2 Car Park
For such a popular hike, I found it very confusing to find the actual official trailhead for the Trolltunga hike from the main trail at P2 Skjeggedal.
I noticed that most other travelers were instead opting to walk up the vehicle access road to Mågelitopp.
This is not necessary.
Instead, you can pick up the trail just beside the small bridge before you get to the P2 car park. This is marked as “Old Trolltunga Starting Point” on Google Maps but is much better than walking the road.

First Section: Steep Rocky Climb Through Patchy Forest
The first section of the hike follows a worn “goat trail” leading up through the forest with rocky, rooty underfoot. This section has some areas with steps and an old rail, as well as some blue ropes fitted to the trees to help you climb.

It is a rather steep 450 vertical meters over 2 kilometers before reaching the next rocky plateau above.
This section is easy to follow. Keep an eye out for the red T markings on the rocks that lead the way.
While I thought that this was one of the most physically demanding sections of the Trolltunga trail, it’s far nicer to walk in nature than walking a series of switchbacks next to cars along the vehicle access road.
We began the hike at 5:00 am and were up at the plateau section in roughly 45 minutes at a fast pace.


The First Rock Plateau
The next section is a nice rest through flat, rocky terrain, crossing a small bridge and a couple of light streams. We also passed a small red mountain hut in this section.
We noticed that there were long, white vertical poles with red markers. These mark the trail through this section in case of adverse weather conditions like heavy rain or thick fog that can impede your vision.


The Trail to Trolltunga
Following the first climb and short rest on the plateau, you’ll want to keep left at the fork near the metal bridge where the trail meets up with the new track leading from the P3 Mågelitopp car park.

Now, you’ve joined the main highway to Trolltunga, which is a very easy trail to follow. It’s well-marked for the entire route and features several undulating sections.
Some of these parts are steep, but nowhere near as steep as the first section from Skjeggedal. However, in wet conditions, I could see that this could be slippery. If you’ve hiked to Kjeragbolten, it’s nowhere near as steep or slippery as this.


Along the way, the views are stunning. Don’t forget to turn around every now and then to look back at the valleys you’ve passed.

Eventually, you’ll reach a small granite face that looks steep but isn’t too bad. Following this, the trail meets up with a steep cliff above Ringedalsvatnet with some of the most amazing views of the Trolltunga hike so far.

Along the way, there are several rescue cabins. These are emergency huts placed by the Norwegian government and are only available in emergency following adverse weather conditions or white outs.

Arriving at Trolltunga – The Troll’s Tongue Viewpoint
It took us roughly 3 hours and 15 minutes to reach Trolltunga from the P2 car park. We kept a steady pace but also stopped to enjoy the view a few times.
You’ll know when you reach Trolltunga– there’s usually a long queue of people waiting to step out onto the rock to pose for photographs. Even though we left at 5 am, there were still loads of people there by 8:30 am!

Stepping Out Onto Trolltunga
Of course, I wasn’t going to hike all this way without getting a photo. I spent a while taking photos of others from the rocks above while waiting for a break in the fog to get a clear view for my own shot.


This line extended out beyond a small, steel ladder bolted onto the rock that allowed access to the rock platform.
Unfortunately, when it came to my turn, I’d lost my opportunity, with heavy fog rolling in to block the entire view!

What’s it like stepping onto Trolltunga? For me, it was a great experience regardless of the conditions. Standing on a small sliver of rock hanging over a vertical kilometer drop is an exhilarating feeling and one I’ll remember for the rest of my life! The view is also incredible and it’s possible to get a glimpse of the Folgefonna from the rock.
If you have a fear of heights, I’d stay clear of this one!
Yes, of course, there are safety issues with stepping out onto this rock with a chance of falling. However, I really respect Norway’s approach to nature and risk. By allowing inherently “risky” viewpoints like Trolltunga, Preikestolen, or Kjeragbolten to be kept accessible leaves safety completely in the hands of the individual, as it should be.
Remember, you and only you are in charge of your own risk tolerance and overall safety. This isn’t the USA or Australia where park officials enforce “helicopter mom” rules. Here, nature is boss and it doesn’t discriminate– or care if you fall.
So, be careful.

Return to the Car Park
This is an out-and-back hike, which means we followed the same trail back to the car park.
On the way down, keep an eye out for the beautiful Folgefonna glacier in the distance.
However, if the legs are sore, there is the option to finish at the Upper P3 car park and take the shuttle bus back down, saving you about 450 meters of decline.

Alternative Route to Reach Trolltunga
Did you know that there is an alternative “Via Ferrata route” to reach Trolltunga?
While I haven’t done this yet, this looks like an amazing experience and involves climbing a near-vertical 250-meter rock face to reach Trolltunga.
This is run by Trolltunga Active and you can book the experience on GetYourGuide. Their tour guide Alice gets an amazing wrap in their reviews!
Useful Tips for Hiking to Trolltunga
- Start Early: Begin your hike as early as possible to avoid crowds. Take advantage of the long summer days but ensure ample daylight for the return trip in winter.
- Wear Proper Gear: This is Norway. I recommend hiking boots to cover the rough and sometimes slippery terrain. Weather can change rapidly; bring waterproof jackets and layers as well.
- Pack Smart: Bring a water bottle there are streams on the trail but it is popular. You may want to bring a Grayl filter in case of upstream contamination. Bring high-energy snacks or enough food for 10-12 hours of hiking, a first aid kit, and a map or GPS device as well!
- Check the Weather: This remote region of Norway is known for sudden weather changes. Always check the forecast and prepare for varying conditions. I always use the YR app and online resource for accurate weather forecasts in Norway.
- Stay on the Trail: For your safety and environmental protection, stick to marked paths.
- Photography: The best light for photos at Trolltunga is in the early morning or late afternoon.
- Parking: Choose P1 for larger vehicles, P2 for proximity and convenience, or pre-book P3 for a shorter hike start.
- Physical Preparation: The hike is demanding. Ensure you’re in good physical shape and consider training beforehand.
- Respect Nature: Leave no trace. Keep the trail clean and minimize your environmental impact.

Photography Tips for Capturing Great Photos
I get it, the main motivation for why over 80,000 people hike to Trolltunga each year is for a chance to snap the perfect photo on the rock platform to share on social media.
Here are some photography tips to help you snap better photos at the viewpoint and on this epic hike.
- Timing: Aim for early morning or late afternoon for the best natural lighting. The soft light during these times reduces the glare on Ringedalsvatnet below and complements the landscape’s textures and colors.
- Beat the Crowds: Arrive early at the Trolltunga viewpoint to avoid the rush and capture unobstructed shots of the rock formation. People are generally polite and stand out of the way.
- Use the Right Gear: I get it, we don’t all carry professional camera gear for travel while hiking. Still, a good camera with a polarizing filter to reduce gear will result in much crisper photos.
- Play with unique perspectives: Experiment with different angles and compositions. I tried to climb down to the platform beneath but honestly, this was a bit sketchy with my camera without any fixed ropes. Instead, I tried to play with different focal lengths from the rock above and closer to the platform.
- Be Mindful of Safety: Always prioritize safety over a great shot. Remember, your life is worth more than a great Instagram photo.
- Embrace the Weather: Norway is moody. Embrace dramatic skies for awesome hiking photos. Even if the weather isn’t perfect, use it to your advantage to capture atmospheric images of Trolltunga.
- Use Natural Elements: Get close to the foreground and incorporate a natural blur in the field of view from the natural elements like rocks or moss. This is a good way to add depth.
- Stay Patient: Great photography often requires patience. Plan with your friends to help you set up and get the photo you want.

Where to Stay Near the Trolltunga Hike
Since the Trolltunga hike is in such a remote region of Norway, staying the night in nearby Odda or Tyssedal is not a bad idea. Below are the three best accommodation options nearby.

Boasting a large range of rooms to suit all group sizes with breathtaking views over the surrounding landscapes Tyssedal Hotel is a great pick. A delicious free breakfast is provided each morning.

2. Trolltunga Aparthotel Great Value
A pet-friendly, fully-equipped apartment hotel located in Tyssedal and 6km from Odda. Private parking is provided on-site. A great choice for those wanting picturesque views of the surrounding mountains.

Located in the town of Odda this highly reviewed apartment-style hotel is close to many cafes. It provides stunning views across the nearby forest and has everything one would need for a comfortable stay.
Where to Park Near the Trolltunga Trail
I touched on all the transport options including the three carparts (P1, P2, and P3) above. However, below is a useful summary table to help you plan where to park your car and start your hike to Trolltunga.
| Car Park | Distance from Odda | Parking Spaces | Parking fee (NOK) |
|---|---|---|---|
| P1 – Tyssedal | 10 min drive | 220 | 300 |
| P2 – Skjeggedal | 25 min drive | 180 | 500 (includes 200 NOK toll) |
| P3 – Mågelitopp Upper Car Park | 30-35 min drive | 30 | 600 + 200 NOK toll (prebook required) |
Check up-to-date parking information here.
Best Time to Hike to Trolltunga
The ideal period for hiking Trolltunga is the summer season, spanning from mid-June to early September.
Early July is a particularly good time to hike in Norway and the time that I chose to trek up to Trolltunga. Speaking from experience, this time of year offers comfortable temperatures and much clearer trails.
However, keep in mind that July and August mark the high season, bringing peak crowds and usually longer waits at the viewpoint. Either way, this is a high mountain region above 1000 meters in elevation. Weather can be unpredictable, so it’s crucial to check forecasts and prepare for sudden changes.

The Rescue Cabins (Emergency Huts)
The Rescue Cabins, also known as Emergency Huts at Trolltunga are an essential safety feature for hikers. These cabins provide shelter in case of sudden weather changes or emergencies. They are strategically located along the trail, offering a place to rest, warm up, or seek refuge if conditions change quickly.
While they are not meant for overnight stays, they are a critical resource for hiker safety. It’s important for hikers to note their locations along the route and to understand that these cabins should only be used in genuine emergencies.
The three Rescue Cabins on the Trolltunga trail are Floren (6.1 km), Endåen (8.3 km), and Reinaskorsbu (11.4 km).

Camping Rules near Trolltunga
Since this is a long hike and a particularly scenic one, doing it as an overnighter would be truly epic! This would also allow you to get to Trolltunga really early even before the first crowds.
However, even with Norway’s Right to Roam rules there are designated areas for camping near Trolltunga. You’ll find them on the map below, which is a photo I took from the trail.


Answered: FAQ About the Trolltunga Hike
No, this hike isn’t part of any National Park. The closest national park is Hardangervidda National Park, which is located to the east of Trolltunga and is Norway’s largest national park.
Unfortunately, someone has lost their life after following a fall from the Trolltunga cliff. Be careful and remember stepping onto this rock is entirely your risk.
Yes, you can hike Trolltunga independently. It’s well-marked, but ensure you’re prepared with the right gear, navigation tools, and knowledge of the trail. A guide is mandatory in the winter season where you may require snowshoes.
No, reaching Trolltunga requires hiking. The shortest route involves a significant trek of around 20 km round trip from the new P3 car park, with no alternative transportation directly to the viewpoint.
If you love amazing views and a once-in-a-lifetime opportunity to stand on one of the world’s most incredible rock viewpoints, then yes, of course, it’s worth it!
Yes, you can hike practically everywhere in Norway with pets. But you should take care of the dogs’ safety and food while keeping them on a leash for the whole hike.
Kids can hike to Trolltunga in good conditions. In fact, I saw three families with young children under eight on the trail. I would say as long as they are prepared for the long day of walking.
While it’s not a National Park, I saw many signs on the trail and near the viewpoint discouraging the use of drones. I’d say that it’s a significant safety risk when there are crowds since it can distract people on the rock.
The Trolltunga hike is quite difficult since it is long at over 28 km and requires a decent amount of elevation gain (800 m). However, it’s not technically difficult by any means.
Yes, you can hike to Trolltunga all year round. However, a guide is required in Winter. I recommend Trolltunga Active.
No, there are no toilets along the trail at all. Remember, part of leaving no trace means packing out EVERYTHING you bring in.
More Norway Adventure & Travel Inspiration
I hope that you’ve enjoyed my comprehensive guide to hiking to Trolltunga. I believe this is the best resource you’ll find on the internet for this popular hike, and I hope it helps you plan an epic trip to this unforgettable viewpoint in Norway.
While you’re here, check out some of my other Norway travel and hiking guides for more inspiration for your trip.