
[ad_1]
A comprehensive trekking guide to the Lemosho Route, a renowned and picturesque trail leading to Uhuru Peak (5,895 m) on the summit of Mount Kilimanjaro– the highest peak in Africa.
Known for its scenic beauty and high success rates, Kilimanjaro’s Lemosho Route offers a gradual ascent, diverse landscapes, and ample time for acclimatization. As a result, this is now one of the best and most popular trekking routes to reach Uhuru Peak, the summit of Mount Kilimanjaro at 5,895 meters above sea level.
This is your one-stop shop for everything you need to know about embarking on a Kilimanjaro expedition via the Lemosho Route. I’ll offer you a rundown of the pros and cons of this route, share a detailed personal account of my own itinerary, and provide valuable tips to help you choose the best trekking company in Tanzania for a successful and memorable climb!

About the Lemosho Route
The Lemosho Route on Kilimanjaro is widely regarded as one of the most beautiful and diverse routes you can pick for your Kili adventure, especially if you don’t have a lot of mountaineering or high-altitude trekking experience.
Starting on the western side of the mountain, the trail gradually traverses through lush rainforests, heathlands, moorlands, and alpine deserts, offering exposure to the full diversity of trekking environments that this iconic mountain offers.
Nonetheless, what really makes the Lemosho Route one of the best Kilimanjaro climbing options is its excellent acclimatization profile, offering a slower and more gradual ascent compared to other routes. A typical 7 to 9-day Lemosho itinerary allows climbers more time to adapt to high altitudes while enjoying the changing landscapes and increases their overall chances of a safe and successful Kilimanjaro expedition.

Booking A Tour Company for the Kilimanjaro Climb
Often overlooked– something even more important than picking the route for your Kilimanjaro climb is choosing the right travel company. But, with thousands of operators to choose from, this is also one of the most daunting tasks, because it really will make or break your expedition.
After embarking on a successful Kilimanjaro expedition with Altezza Travel, I can now understand why this company is widely known as the best operator inside Tanzania.
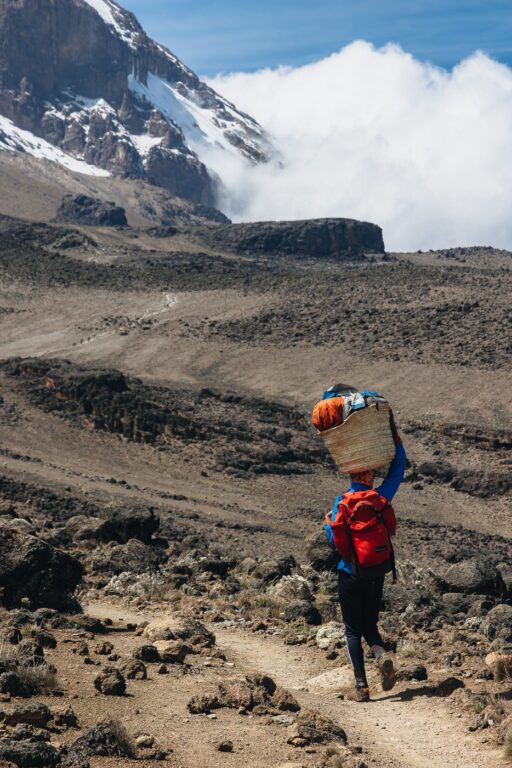
As the top-rated provider on TripAdvisor, Altezza has many years of expertise, an impeccable safety record with the highest summit success rates, and a team of highly experienced and well-paid guides. One of the big things for me is that they’re also a member of the Kilimanjaro Porters Assistance Project (KPAP)– ensuring safe and ethical working conditions for their porters and support staff.
Discount: Altezza is offering all We Seek Travel readers a 5% DISCOUNT on the Kilimanjaro climb when using the code weseektravel during your initial inquiry.

Video From Our Lemosho Climb
Is Lemosho the Best Route to Hike Mount Kilimanjaro?
While you already know that the Lemosho Route is one of the best options in terms of summit success rates, there are many other reasons why climbers would choose this route when seeking an unforgettable journey to the Roof of Africa.
Pros of the Lemosho Route
Below are the standout benefits of choosing the Lemosho Route over other popular trekking routes on Kilimanjaro Mountain.
- Excellent acclimatization profile: The Lemosho Route provides a longer trekking duration. This allows for gradual altitude gain and better acclimatization overall, increasing the chances of reaching the summit and minimizing the risk of altitude sickness.
- More gentle climb: As far as 5,895-meter peaks go, climbing Kilimanjaro via the Lemosho Route is very gentle and suitable for a wider range of fitness levels.
- Very scenic: Climbers who pick the Lemosho Route will get to experience all of the unique Kilimanjaro climate zones, including the cultivated zone, rainforest zone, Afro-alpine moorland zone, the alpine desert zone, and the arctic zone.
- Less crowded than the Machame Route: While still quite a popular route, Lemosho is much less crowded than the Machame Route. This provides a more peaceful and immersive experience overall.
- Flexibility in Itinerary options: The Lemosho Route offers flexible itineraries ranging from 7 to 9 days. The result is that climbers can choose the duration that best suits their fitness level and climbing preferences.
- Rainforest: Trekking through the rainforest is an amazing addition to the trek.
Cons of the Route
Of course, there are also some small downsides to choosing this route.
- Can be more expensive: Due to the longer itinerary options, the overall cost of the Kilimanjaro expedition can become more expensive.
- Merges with Machame: The trail merges with the Machame Route in sections and therefore can get crowded in those stints.
- Lemosho Londorossi Gate: The road leading to the Londorossi Gate can be very rough after the rainy season.

Lemosho Route Success Rate
Of course, the ultimate goal on the mountain is to have a great, memorable time. In saying that, getting to the summit is also a big priority!
Luckily, the Lemosho Route has the highest success rate of any Kilimanjaro expedition route, at roughly 95% for trips with the top-rated companies. You’ll find that this summit success rate percentage varies significantly between operators.
Operators like Altezza with higher success rates overall implement several strategies to keep their numbers high, including:
- Employ trained medical guides: The top agencies train their guides to recognize signs of altitude sickness and to respond accordingly.
- Daily or twice-daily medical checks. Monitoring oxygen saturation levels and the climbers’ overall physical and mental condition and adjusting the climb accordingly to maximize the chances of a safe, successful summit.
- Help with preparation before you arrive: As with any expedition, preparation is key. The top operators offer proper physical training and preparation programs, as well as personalized gear recommendations.
- High-quality food: If you have any experience at altitude, you’ll know that eating adequately and drinking enough water is your key to feeling good on the mountain. High-quality operators employ dedicated chefs to offer a nutritionally-balanced menu to give you the energy that you need when climbing Kilimanjaro.
- Quality gear & tents: On my Lemosho Route expedition, I saw a group of tents blow down overnight from heavy wind. Spending a little extra on a reputable company goes a long way!

Lemosho Route Trek Details:
- Days: 6-8 day itineraries
- Total Hiking Distance: 61 km (38 mi)
- Total Elevation: 3,700 m (12,100 ft) up, 5,500 m (18,000 ft) down
- Highest point: Uhuru Peak (Mount Kilimanjaro Summit) 5,895 m (9,340 ft)
How Much Does it Cost to Trek the Lemosho Route?
The cost of climbing the Lemosho Route can vary depending on several factors, including the quality of the tour operator (think support staff, kitchen staff, tents, food, etc), and the number of days on your itinerary.
On average, the cost for a Lemosho Route climb ranges from $2,000 to $5,000 per person.

Typical Lemosho Route Itinerary
When choosing your Kilimanjaro climbing program for the Lemosho Route, you’ll have three different itinerary options, 6 days, 7 days, and 8 days. From personal experience on the route, I recommend picking the 7-day itinerary, as it offers the best balance of acclimatization and enjoyment on the mountain.
Below are the three typical itineraries for the Lemosho Route.
Option 1: 6-Day Itinerary
A six-day itinerary is slightly fast for the Lemosho Route and only recommended for those with previous experience and recent high altitude exposure. This is a faster itinerary since you will trek all the way from the high-altitude drop-off area to sleep at Shira Camp 2 (3,900 m) on the first night.
| Day | Distance | Hiking Time | Elevation |
|---|---|---|---|
| 1. Shira Plateau to Shira 2 | 11 km | 5-6 hours | 3,500 m to 3,900 m |
| 2. Shira 2 to Barranco Camp via Lava Tower | 12 km | 6-8 hours | 3,900 m to 4,630 m 4,630 m to 3,960 m |
| 3. Baranco Camp to Karanga Camp | 5 km | 4-5 hours | 3,960 m to 4,035 m |
| 4. Karanga Camp to Barafu Camp | 6 km | 4-5 hours | 4,035 m to 4,640 m |
| 5. Ascend Uhuru Peak & down to Millenium Camp | 15 km | 8-12 hours | 4,640 m to 5,895 m 5,895 m to 3,820 m |
| 6. Descent to Mweka Gate | 12 km | 4-5 hours | 3,820 m to 1,640 m |
Option 2: 7-Day Itinerary (The Best Option)
A seven-day Lemosho Route itinerary offers the best balance of acclimatization benefits and fitness for the highest success rate.
| Day | Distance | Hiking Time | Elevation |
|---|---|---|---|
| 1. Shira Plateau to Shira 1 | 5 km | 1-2 hours | 3,500 m to 3,505 m |
| 2. Shira 1 to Shira 2 via Cathedral Point | 10 km | 5-4 hours | 3,505 m to 3,872 m 3,872 m to 3,900 m |
| 3. Shira 2 to Barranco Camp via Lava Tower | 12 km | 6-8 hours | 3,900 m to 4,630 m 4,630 m to 3,960 m |
| 4. Barranco Camp to Karanga Camp | 5 km | 4-5 hours | 3,960 m to 4,035 m |
| 5. Karanga Camp to Barafu Camp | 6 km | 4-5 hours | 4,035 m to 4,640 m |
| 6. Ascend Uhuru Peak & down to Millenium Camp | 15 km | 8-12 hours | 4,640 m to 5,895 m 5,895 m to 3,820 m |
| 7. Descent to Mweka Gate | 12 km | 4-5 hours | 3,820 m to 1,640 m |
Option 2: 8-Day Itinerary
An eight-day itinerary on the Lemosho Route allows for a more gradual initial acclimatization profile. This is because it begins with a trek all the way from Londorossi Gate, rather than a drop off at Shira Plateau high-altitude area.
However, this is more expensive, with more time on the mountain sometimes resulting in more fatigue.
| Day | Distance | Hiking Time | Elevation |
|---|---|---|---|
| 1. Londorossi Gate to Mti Mkubwa | 6 km | 3-5 hours | 2,200 m to 2,780 m |
| 1. Mti Mkubwa to Shira 1 | 5 km | 5-6 hours | 2,780 m to 3,505 m |
| 2. Shira 1 to Shira 2 | 12 km | 7 km | 3,505 m to 3,900 m |
| 3. Shira 2 to Barranco Camp via Lava Tower | 12 km | 6-8 hours | 3,900 m to 4,630 m 4,630 m to 3,960 m |
| 4. Barranco Camp to Karanga Camp | 5 km | 4-5 hours | 3,960 m to 4,035 m |
| 5. Karanga Camp to Barafu Camp | 6 km | 4-5 hours | 4,035 m to 4,640 m |
| 6. Ascend Uhuru Peak & down to Millenium Camp | 15 km | 8-12 hours | 4,640 m to 5,895 m 5,895 m to 3,820 m |
| 7. Descent to Mweka Gate | 12 km | 4-5 hours | 3,820 m to 1,640 m |
Kilimanjaro Map: The Lemosho Route
Below is a useful map you can save to visualize the trekking progress along the Lemosho Route to Uhuru Peak summit.

Acclimatization Profile (7-Day Lemosho Itinerary)

High Altitude Trekking Travel Insurance for a Kili Expedition
Since most travel insurance companies void their coverage as soon as you step over 4,500 meters above sea level, it might be a good idea to consider specialized trekking travel insurance for your Kilimanjaro expedition. In fact, most tour operators mark it as a mandatory obligation.
However, finding the right insurance can be difficult. In my experience, the below three options might be worth checking out as a starting point.
- Global Rescue Membership – helicopter rescue membership with no altitude caps. One of the most popular options for rescue insurance on Kilimanjaro.
- World Nomads – offers peace of mind travel insurance. Check their PDS for options related to high-altitude trekking.
- Heymondo – my new favorite general travel insurance policy with affordable prices and an excellent app. Has an altitude cap of 5,000 meters, so you may not be covered for the summit push.

Where to Stay in Arusha Before Your Kilimanjaro Climb
Arusha is the main base to begin your climbing expedition on Kilimanjaro, and the city where most safari companies will depart from. Below are the three best places to stay in Arusha before embarking on your unforgettable adventures in Tanzania.

1. Gran Melia Arusha Luxury
With immaculate grounds and incredible views of Mt Meru it is hard to beat this luxury pick. Boasting a swimming pool, sauna, and fitness center, this is the perfect place to unwind before & after your Mt Kilimanjaro climb.

2. Africa Safari Arusha Mid-Range
A great choice for families or large groups. Rooms are beautifully decorated and there is a large outdoor swimming pool. There is an onsite restaurant that serves many cuisines.

3. White House of Tanzania Budget
This newly renovated hostel for budget travelers & backpackers boasts a large bar area & comfortable beds in a quiet location. The staff are always there to help you plan your adventures in Tanzania.
Staying Connected on the Lemosho Route
Typically, your home country SIM with roaming will not work effectively on Kilimanjaro. If you need to stay connected to communicate with friends and family, I suggest getting a local SIM card. While you can buy one at Kilimanjaro International Airport, it can be time-consuming with all the paperwork required in African countries. Therefore, the easiest way is to purchase a Tanzacom eSIM online using Airalo.
This is a simple eSim setup that you can activate even before you arrive in Tanzania so that you’re ready to go when you land. I purchased the 2GB, 15-day package for just $8 and it worked just as well as the guides’ phones after dropping into the Barranco Valley (a clearer direct route to Moshi towers). However, there was no connectivity on the Shira Plateau, or near the summit.
Therefore, if sending and receiving updates from your loved ones is important to you throughout the entire trek, I highly recommend investing in an inReach Mini.

My Experience Climbing Mount Kilimanjaro on the Lemosho Route
With the logistics out of the way, let’s dive into my personal account of climbing Kilimanjaro along the Lemosho Route. I’ve included a lot of photos in this section to give you a better understanding of what to expect on the mountain.
Day 1: High Altitude Drop-off Point to Shira Camp 1
- Hiking Distance: 5 km
- Time: 1-2 hours
- Total Elevation Gain: N/A
- Difficulty: Easy
After weighing our duffel bags, leaving our valuables with the Altezza Team, and filling our bottles, we were off on our great adventure to the Roof of Africa.
We stayed at the Aishi Machame Hotel just outside the village of Machame the night prior. This meant we were in for a short but scenic 1.5-hour drive to the Londorossi Gate (2,200 m) to begin our expedition.


Once we arrived, we were greeted by our guides, who filled out the relevant paperwork for us while we enjoyed our hot lunch over ice-breaking conversations amongst our group. Shortly after, we commenced the steep and slightly bumpy minibus ride to the Shira Plateau drop-off area at 3,500 m to begin the trek.
Driving from the plains to this high-altitude plateau meant the air was particularly crisp, which aided with the excitement that filled the group as we set first foot on the meadowed trail, ready to embark on our Kilimanjaro adventure.

The trek on day one is a very easy, slow, and entirely flat walk to the Shira Plateau. This huge expanse of flat moorland surrounded by the Shira Ridge is actually the remnants of an ancient volcanic caldera. Millions of years ago, the Shira volcano was the first eruption on Kilimanjaro and the original summit. However, subsequent volcanic activity and erosion caused its collapse, leaving behind the expansive plateau we were walking along for the first days of the Lemosho Route.

Unfortunately for us, the mighty mountain greeted us with a heavy downpour for the majority of our short 1-hour hike to Shira 1 camp. Once we arrived, our excellent support team had already set up our tents, which meant we could crawl in, get dry, and wait for a hot dinner.
That night the clouds parted to reveal our first glimpse of the mighty Kilimanjaro Mountain, set in front of a beautiful and incredible milky way backdrop, a majestic reminder of the grand challenge ahead.


Get Safe Drinking Water Anywhere!
Enter the Grayl GeoPress Water Filter & Purifier Bottle! I take this bottle on every hike and use it as my go-to source for filtering water all over the world. I’ve even used it to drink tap water in India!
// Compare how the GeoPress stacks up against the best water bottle filters on the market.
Day 2: Shira Camp 1 to Shira Camp 2 via Cathedral Point
- Hiking Distance: 10 km
- Time: 4-5 hours
- Total Elevation Gain: 570 m
- Difficulty: Easy
Awaking to a beautiful crisp morning and bluebird skies, we downed a delicious breakfast of pancakes, eggs, and porridge, which offered us a renewed sense of excitement and determination for the mission ahead.

The goal for today was Shira Camp 2. But, first, we wanted to reach the nearby Cathedral Point (3,872), also known as Shira Peak for being the highest point of the ancient Shira Volcano.
The first section of the trail follows very slightly inclining moorland, covered in small shrubs and beautiful Everlasting Flowers. This trail cuts almost directly through the middle of the vast plateau, offering a great warmup for the Kilimanjaro climb. The elevation gain is very gradual, climbing just 240 meters over 5.5 km upon reaching the camp spot before the short climb to Cathedral Point.


Once we arrived, we dropped our packs and climbed the steep, rocky slopes for about 100 vertical meters. Climbing this steep ridge was remarkably easy without our packs and took less than 10 minutes. However, the jump in altitude is a great acclimatization strategy to ensure a safe and comfortable ascent in the days to come. Remember the mountaineer’s mantra, climb high, sleep low.
Cathedral Point (3,872 m)
Cathedral Point summit is marked by the familiar, encouraging Kilimanjaro National Park signs, where everybody takes the obligatory photograph. For us, the view from this point was much more interesting than the sign.
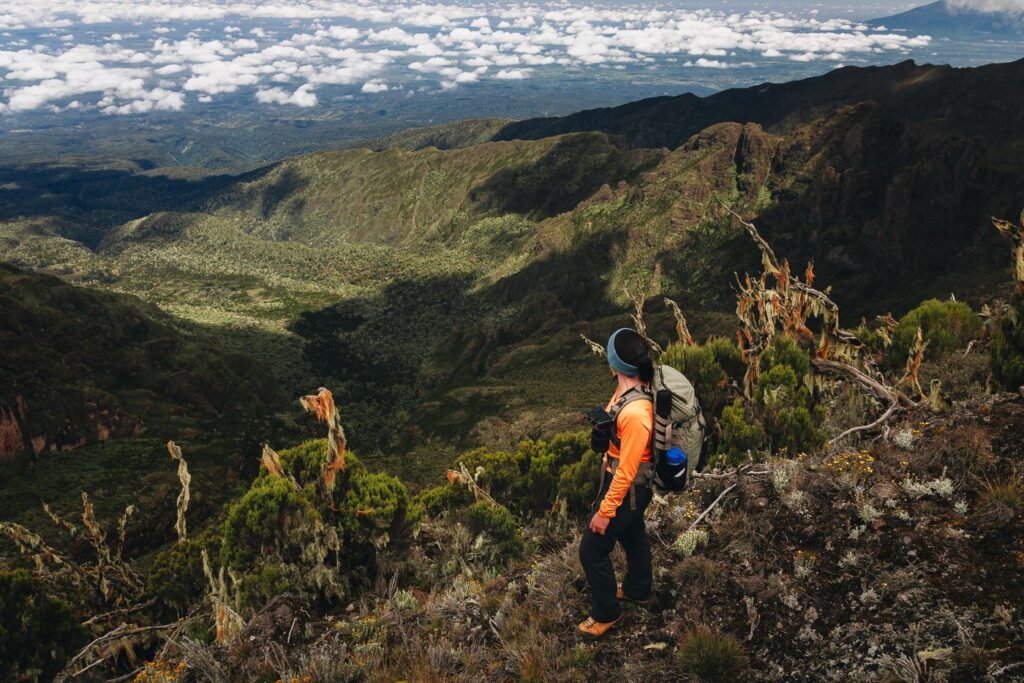
Before us, we had a 360-degree panorama for the best views of the Lemosho Route expedition so far, with an amazing view of the Shira Plateau that we’d just begun to cross. Additionally, to the north, our eyes were immediately drawn to the majestic peak of Kilimanjaro, towering proudly above the clouds. And, perhaps most impressive of all, looking down towards the east, we got our first glimpse of the undulating plains of Tanzania stretching out endlessly into the African horizon.

After spending 15-20 minutes at the summit, we hiked down to where our kitchen staff were waiting for us with hot tea and biscuits.
Pressing on to Shira Camp 2 (3,900 m)
Next, we resumed our trek towards Shira Camp 2, our camp for the night. The trail continued for roughly 4 kilometers through the moorland, with vegetation getting more sparse as the altitude rose. From Cathedral Point, the track gains altitude again gradually, taking just over an hour to reach Shira Camp 2.

Arriving at the camp, we set into what would become our daily routine on this Kilimanjaro Lemosho experience. Crawling into our tents, we took a mountain shower (wet wipes), got changed into our clean sleeping clothes, and met in the dining tent to relax with hot cocoa, coffee, tea, and biscuits while we waited for dinner.
By now, having spent over 24 hours together, the group was feeling much more comfortable, sharing jokes and laughs at the table. We were stoked that we had an amazing, like-minded group of people for this expedition, making the entire trip so much more enjoyable and memorable! What made things better was a magical sunset to set the mood for the upcoming challenge.


Each night after dinner, our lead guides would give us a briefing for the day to come, followed by a thorough medical which included taking an oximeter reading to see how we were coping with the altitude. This was then repeated in the mornings after breakfast.

Insurance for the Kilimanjaro Trek
Read the fine print– Most travel insurance companies void coverage as soon as you step over 5,000 m. That’s why I use and recommend Global Rescue, which offers yearly or expedition-based rescue coverage with no altitude caps.
Day 3: Shira Camp 2 to Barranco Camp via Lava Tower
- Hiking Distance: 12 km
- Time: 6-8 hours
- Total Elevation Gain: 860 m
- Difficulty: Moderate
By day three, we were already very used to the morning routine. To set the mood for the day, we’d wake up to a knock on the tent by the Altezza kitchen staff offering us hot coffee in the tent. Next, we got dressed in our trekking clothes and packed our duffels so that our porters could head up to the next camp.
Then, after filling our drink bottles, we met in the mess tent for another delicious and filling breakfast. After the morning medical checkup, we strapped on our backpacks and hit the trail.

On day 3, our goal was the famously scenic Barranco Camp. However, first, we had to climb up to the Lava Tower. At an altitude of 4,572 m, this would be the highest point of the Lemosho Route until we reached Barafu Camp.
Leaving Shira Camp 2 behind, we ventured further into the moorland landscape, where the terrain became rockier and the vegetation even sparser. The trail ascended very gradually, presenting us with a pleasant walk that wasn’t too difficult.

As we approached well over the 4,000 m elevation mark, the dry moorland turned into an alpine desert. The terrain was dusty and very dry, with all signs of life gone– a sign we were getting closer to our goal.

Lava Tower (4,572 m)
After roughly 6.5 kilometers, we reached the Lava Tower, a striking volcanic rock formation standing tall beneath Mount Kilimanjaro. This was quite a busy scene, with many tour groups stopping here for lunch, and some setting up camp for the night.
Climbing Lava Tower provides some great acclimatization benefits since we’d now gained more than 700 vertical meters from where we slept the night prior. With the aim of maximizing the acclimatization benefits before the long descent, we rested at Lava Tower for roughly two hours, enjoying hot lunch and coffee in the mess tent that our staff had already erected when we arrived.

Descent to Barranco Camp (3,960 m)
Bellies full and spirits high, we filled our drink bottles, strapped on our bags, and began the descent to Barranco Camp. We were moving much quicker on the descent, although reluctantly losing that hard-earned altitude with every step.

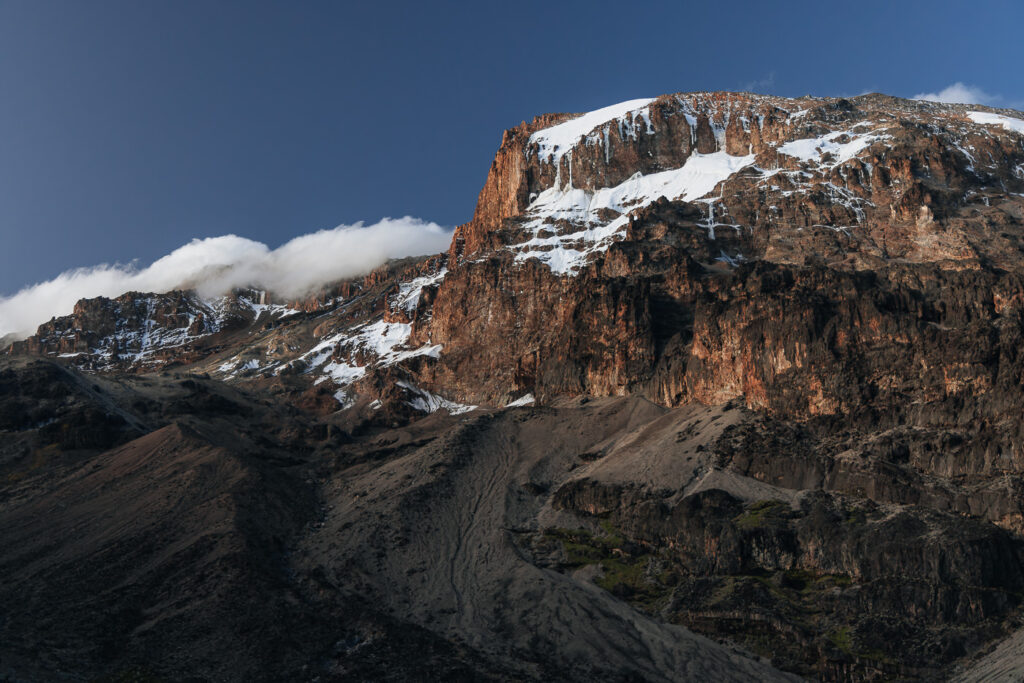
Winding down the volcanic slopes we dropped into the Barranco Valley, a rugged and dramatic landscape on the southern side of Mount Kilimanjaro. It’s surprising just how much life starts to return with the drop of a few hundred meters of elevation. Soon, we were walking through a beautiful forest of Dendrosenecio kilimanjari, or the giant groundsel, a beautiful, endemic plant found only on Kilimanjaro mountain.


Soon, after trekking less than 4 kilometers from the Lava Tower, we arrived at Barranco Camp, perched on a high cliff overlooking the Tanzanian plains to the south. Luckily, we arrived just in time, as the wind really picked up almost immediately after we got into our tents and only got stronger overnight.


Day 4: Barranco Camp to Karanga Camp
- Hiking Distance: 5 km
- Time: 4-5 hours
- Total Elevation Gain: 400 m
- Difficulty: Moderate
After a blustery night, we woke up at Barranco Camp to a calm, clear day offering a welcome change from the wild winds the night prior. Today, it was time to begin our journey toward Karanga Camp. So, following the now familiar morning ritual, we headed towards the great Barranco Wall.


Climbing Barranco Wall
After crossing a stream and switching back through a giant groundsel forest, we arrived at the base of the gorge wall known as the Barranco Wall.
Looking up, the wall seems very steep. However, there is an easy route carved into the wall, leading to the top via a series of switchbacks that involve some very light scrambling. The climb up the wall was quite easy, taking our time and enjoying the excellent views along the way.

After just 30 minutes, we reached the top, having climbed roughly 250 vertical meters to an elevation of around 4,175 m. Once again, we met our amazing Altezza kitchen staff at the top, who offered us tea and biscuits. We sat here for about twenty minutes, watching the clouds clear around the crater rim of Mount Kilimanjaro above us, with her glaciers finally clearly visible for the first time.


Pushing on to Karanga Camp
After a short rest, we began the short descent into the Mars-like landscape of the Karanga Valley, before again climbing slightly. Then, we followed a final long descent back down through a misty forest to an altitude of 3,800 meters.


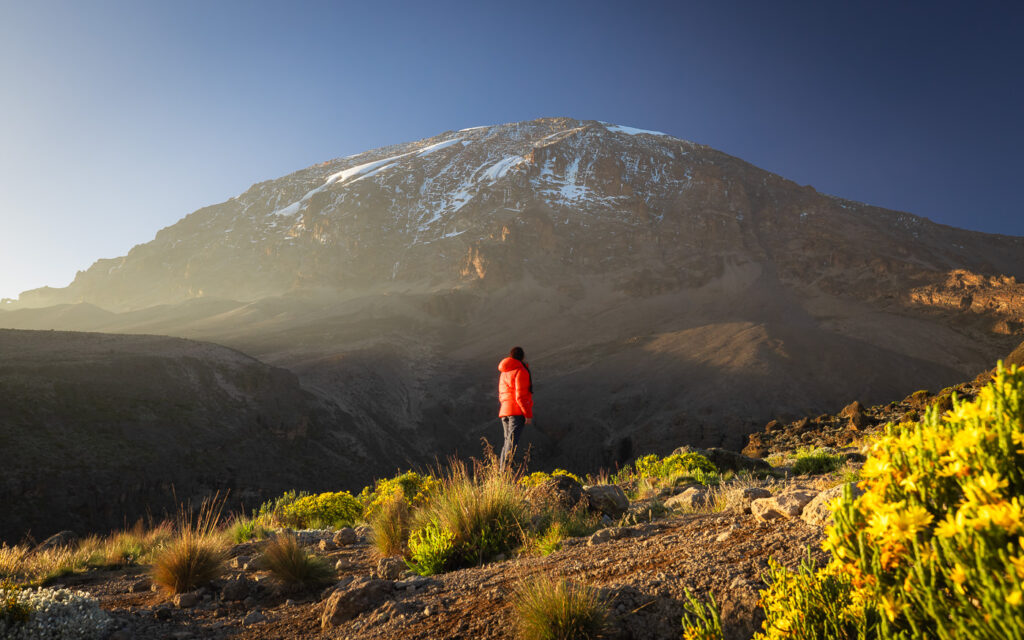
The final push up to Karanga Camp is quite steep but only lasted about 10 minutes. Once we settled into camp, we set up the cameras to capture some of my favorite sunset shots of our journey along the Lemosho Route.

Later in the evening, following our dinner, we were treated to some of the clearest skies we had seen throughout the entire Lemosho Route.

Even after the sunset, the absence of clouds gifted us with an awe-inspiring display of the expansive Milky Way, radiantly illuminating the night sky above. As we gazed upward, captivated by its brilliance, the distant glow of civilization from Moshi town cast an incandescent blue hue that shimmered beneath us.

How I Stay Connected Off-Grid
I’ve been using the Garmin InReach Mini satellite communicator for all serious treks and expeditions since 2020. It lets me send unlimited SMS anywhere on earth and has an emergency SOS feature that could save your life.
Day 5: Karanga Camp to Barafu Camp
- Hiking Distance: 6 km
- Time: 4-5 hours
- Total Elevation Gain: 590 m
- Difficulty: Easy
The fifth day of the Lemosho Route involves a very brief trek up to Barafu Camp, the base camp for Mount Kilimanjaro summit. After breakfast, we hit the trail, which led us through a mix of rocky terrain and alpine desert.
After roughly 1.5 kilometers, the trail levels out at a narrow plateau beneath Kilimanjaro. This is where we again, took a short tea break before climbing the final hill to Barafu Camp.


Day 5 is very short, but the altitude is now over 4,600 meters. Therefore, to maximize our chances of a successful summit, we made a short acclimatization hike, following the trail that we’d again take that very same night on our summit push.

Barafu Camp
Once back at camp, we had an early dinner, at around 4 pm. While everybody was very eager for the summit, our experienced guides assured us that we needed to hit the sack to get as much sleep as we could. That’s because we’d be up again at 10 pm that night for the final trek to Mount Kilimanjaro summit!

Day 6: Summit Night: Barafu Camp to Uhuru Peak & Down to Millenium Camp
- Hiking Distance: 15 km
- Time: 8-10 hours
- Total Elevation Gain: 1,150 m
- Difficulty: Hard
At 10 pm, leaving most of our non-essential items behind in our tents, we layered up, strapped on our headlamps, and crawled out of our tent and into the communal mess tent.
After a quick breakfast, we were off on our final summit push towards Uhuru Peak, the summit of Mount Kilimanjaro. This is the most difficult trekking day of the Lemosho Route, or any route on Kilimanjaro, involving over 1,000 meters of elevation gain.

In saying that, the route is very easy to follow and well-worn, making this climb quite straightforward. The first section is a gradual, straight climb with rocky underfoot. Then, the endless switchbacks along the soft, volcanic alive desert soil begin. Of course, all of this is in the dead of night, meaning it’s difficult to see how far we had to go, or how far we’d come.

However, the most challenging part about the summit push is the cold, which during our early-June climb was around -10 degrees Celcius at the lowest. Saying that, at other times of the year it can get as low as -30 degrees with wind chill.
Climbing slowly, at roughly the halfway mark, our group split into two, with the faster trekkers continuing on and a few others taking a slower pace. This is common on the summit day for the Altezza expeditions, as they employ many guides and even get the porter’s help as support to achieve a high guide-to-climber ratio. These are among the many strategies employed to ensure as many climbers get to the summit as safely as possible.

As we climbed, the gaining altitude meant conditions were getting much colder. However, we were adequately prepared with a good layering system, a warm hat, warm mitts, and a buff, which made trekking through the sub-zero temperatures much more bearable.
Reaching Stella Point (5,756 meters)
While it seemed like the summit push was going on forever, with no warning we finally arrived at Stella Point on Kili’s crater rim. With just over 100 meters of elevation to go, this point at the edge of the Kilimanjaro Caldera marks the end of the grueling switchback climb.


While it was tempting to take a rest at Stella Point, we noticed the warm glow of the sun just about to rise over the African plains behind us. So, with the goal of reaching Uhuru Peak for sunrise, we set off for the final push.
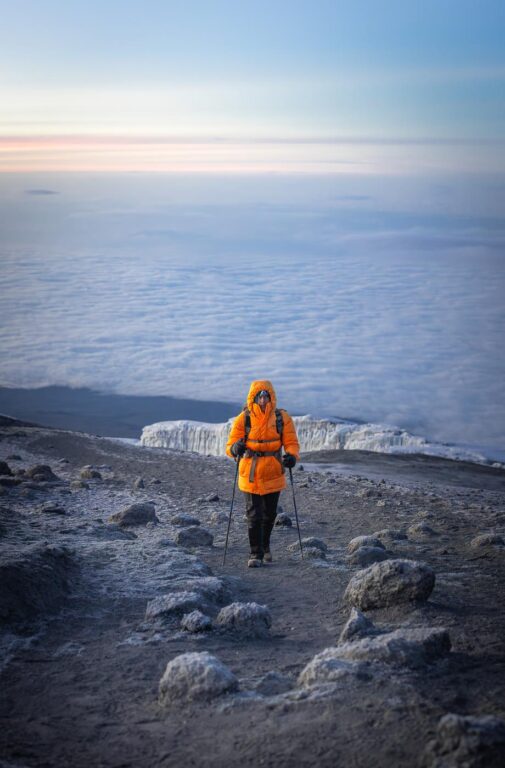
Even with the high altitude, the trek from Stella Point to Uhuru Peak is very enjoyable. It’s much less steep than the switchback climb, and the views are absolutely incredible. Finally, we could see Africa’s last permanent glaciers up close in this arctic zone, with the sun slowly bathing these icy forms in a mesmerizing glow.


Uhuru Peak (5,895 m) – The Summit of Kilimanjaro
At just before 6 am, we made it to Kilimanjaro Summit.
The atmosphere at the summit held a blend of celebratory excitement and a tranquil stillness. We took a moment to take in the scene in front of us. Sharing that extraordinary moment atop the Roof of Africa with my partner Haylea was an immensely profound experience that has etched an indelible memory that I’ll carry fondly for the rest of my life.


Then, after some rushed photos, we began the long descent back down to Barafu Camp. Most Kilimanjaro climbers will tell you that the hardest part of the Lemosho Route is the descent from Uhuru Peak. The track is made up of heavy scree and is very dusty and long, resulting in a grueling, knee-burning descent.


By 9 am, we had arrived back at Barafu Camp, where a congratulatory late breakfast was waiting for us. Scoffing our hard-earned meal, we crawled back into our tents for a 2-hour rest, mission successful and very ready for a hot shower.
Descent to Millenium Camp
Considering the exhaustion from the long night, the thought of packing our bags and embarking on another descent was not particularly appealing. However, fueled by the high from our successful summit and the tantalizing thought of that much-needed shower, we rallied ourselves, gathered our gear, and set off on the relatively short descent to Millennium Camp, also confusingly referred to as “High Camp”.
This trail is an easy, steady descent, that was much less brutal than the descent from Uhuru Peak. As we made our way down, dropping in altitude, shrubs and small trees started to reappear.
Then, after just 1.5 hours, we arrived at Millenium Camp. That afternoon, we all relaxed in the mess tent for hours, sharing stories from the summit and relishing an outstanding 100% success rate for our crew! Well done guys.


Day 7: Descent to Mweka Gate
- Hiking Distance: 12 km
- Time: 4-5 hours
- Total Elevation Gain: N/A – 2,150 m descent
- Difficulty: Easy
Waking up to the final day of our Lemosho Route itinerary, our Altezza team performed a beautiful song and dance for us, a celebration of a successful mission on Mount Kilimanjaro. Then, strapping up our backpacks for the final time, we began the descent toward Mweka Gate, the exit point from Kilimanjaro National Park.


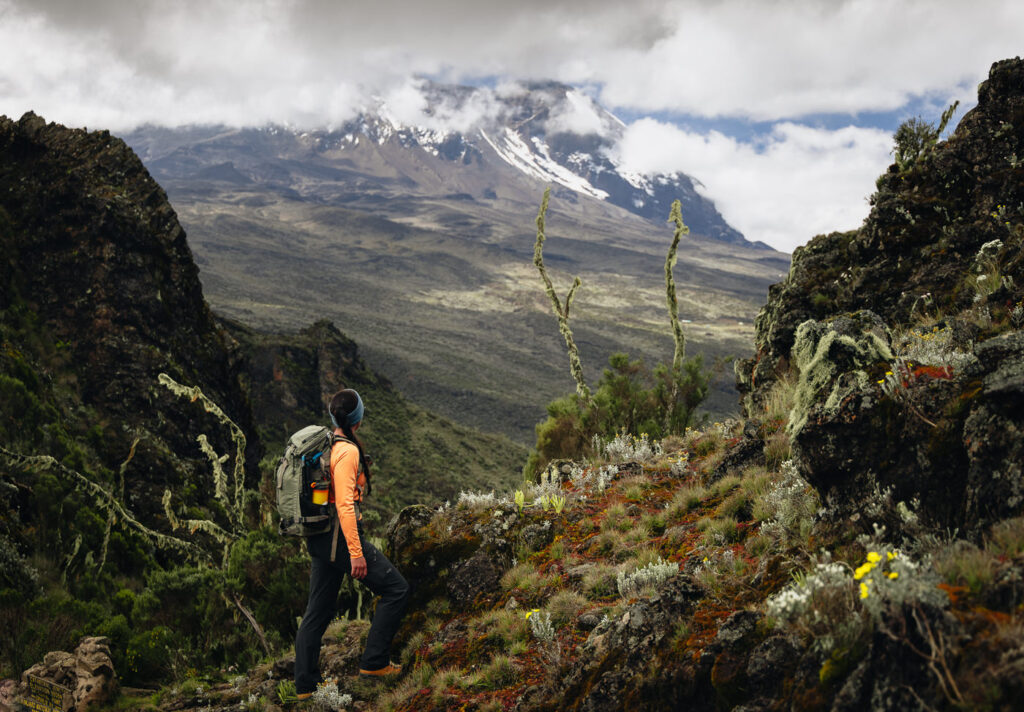
To me at least, this day was easily one of the most beautiful. Starting in rugged moorland, we slowly dropped into the dense rainforest. This was such a stark contrast to the barren landscapes we had been traversing over the past week.
The lush greenery surrounded us and created a truly enchanting atmosphere, with the melodies of rainforest birds guiding our speedy footsteps past Mweka Camp and off the mountain. As we approached the lower altitudes, the trail became very wet and slippery. We managed to skid down the Mweka trail quite effectively but were told that in the wet season, this is a very sketchy section.


Five hours after leaving the morning camp, we arrived at Mweka Gate. Here, we all sat and enjoyed a well-deserved beer and the final meal prepared by our awesome Altezza kitchen staff, before taking the one-hour drive back to the Aisi Machame Hotel on the outskirts of Moshi.

Accommodation & Food on the Lemosho Route
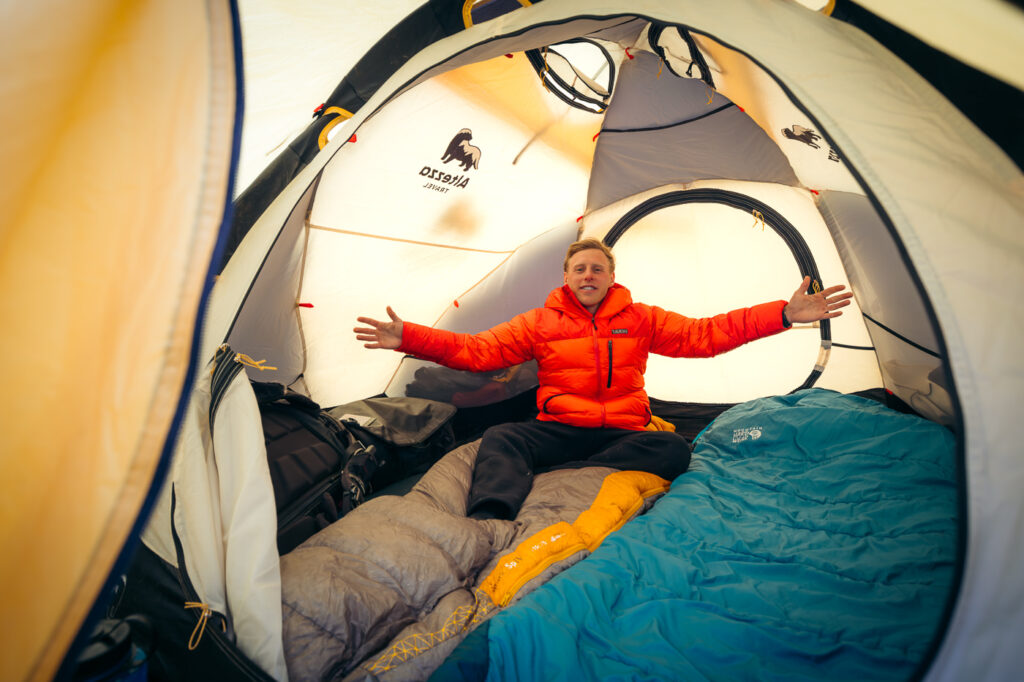
During the Kilimanjaro climb, the food and accommodation arrangements vary greatly depending on which tour provider you pick. However, most reputable companies will be offering three balanced meals per day served in a communal dining tent, and offer personal 2-man tents for comfortable sleeping arrangements.
Climbing with Altezza, we did not need to bring any sleeping pads as the mattresses provided were very comfortable inside the tents. If you’re unsure about what to bring, I recommend contacting your tour company or reading the packing list section below.

What Are the Other Kilimanjaro Climbing Routes?
Still not sure if the Lemosho Route is for you? Luckily, there are many other ways to climb Kilimanjaro. Below is a brief summary.
- Marangu Route (Coca-Cola Route): The oldest and most popular route. It features hut accommodations instead of camping and quite gradual ascent paths.
- Machame Route (Whiskey Route): The second-most popular route that is renowned for its scenic beauty. It offers diverse landscapes but is usually quite crowded.
- Rongai Route: Approaching Kilimanjaro from the north, this route is much less crowded with stunning views and decent success rates.
- Umbwe Route: A challenging and steep route with fewer crowds, suitable for experienced climbers seeking a more adventurous ascent.
- Northern Circuit Route: The longest route, known for its excellent acclimatization profile and breathtaking panoramas as it circles around the mountain.
- Shira Route: Starting at a higher altitude, it merges with the Lemosho Route after Shira Camp.
- Western Breach Route: An alternative ascent option on Mount Kilimanjaro, known for its steep and challenging terrain. It involves a direct ascent up the western side of the mountain.
Each route presents its own unique features, challenges, and perspectives, allowing climbers to choose the one that aligns with their preferences, experience, and desired adventure.

Useful Tips for a Successful Uhuru Peak Summit
If you’ve chosen the Lemosho Route to climb Kilimanjaro, then you already have great chances of a successful summit. Nonetheless, here are some actionable tips for increasing your chances of reaching Uhuru Peak.
- Train and prepare: Failing to prepare is preparing to fail. Remember that while Kilimanjaro is one of the easiest mountains of its size to climb, it’s still a 5,895 m mountain, and the tallest freestanding mountain in the world– that’s no joke. Embrace this challenge by preparing a regular fitness regimen prior to your climb. Focus on cardiovascular exercises, endurance training, and hiking to build strength and stamina. Trust me, the better prepared you are physically, the easier the climb will be.
- Pack appropriate gear: Invest in good-quality gear, including good-quality hiking boots, warm, layered clothing, a warm sleeping bag, and a comfortable, well-fitted backpack.
- Stay hydrated and nourished: Anyone who’s spent time at altitude will bang on about the importance of drinking and eating on the mountain. Listen to them. Drink plenty of water throughout the climb and even if you begin to lose your appetite (it’s normal at high altitudes), eat the balanced meals provided by your trekking company to maintain those energy levels.
- Follow the guidance of experienced guides: These guys have climbed the mountain hundreds of times. Listen to your guides’ instructions and advice. Trust their expertise and adhere to their recommendations for a safe and successful climb.
- “Pole Pole” – Take it slow and steady: Climbing Kilimanjaro is not a race. Pace yourself and maintain a slow and steady rhythm during the ascent. While it might seem annoying if you’re used to hiking at a fast pace, this approach is crucial for acclimatization.
- Listen to your body: Pay attention to any signs of altitude sickness or fatigue. Communicate openly with your guides about how you’re feeling. Don’t keep issues to yourself.
- Enjoy the climb: While reaching the summit is everybody’s goal, remember that the trek itself is an extraordinary experience. Flying to Tanzania and stepping foot on the world’s tallest free-standing mountain is a huge undertaking in itself!

Essential Kilimanjaro Packing List
Here’s my recommended Kilimanjaro packing list. Remember to consult with your tour agency to see what is included and what you must bring yourself.
Trekking Clothes & Gear
- Small 30-40L backpack
- Hiking boots
- 3-4x Merino hiking socks
- 1-2x Trekking pants
- 1-2x Long sleeve trekking shirts
- 1x trekking shorts (optional)
- Fleece mid-layer
- Waterproof or Goretex shell
- Big poncho
- Down or synthetic insulation jacket
- Hat & beanie
- Buff
- Sunglasses (cat 3 or cat 4 with side shades)
- Lightweight liner or trekking gloves
- Sunscreen
- Grayl GeoPress Water Bottle Filter
- Trekking poles
- Underwear
- Leg gaiters
- Summit jacket (down)
- Summit pants
- Summit socks


FAQs About Climbing the Lemosho Route on Mount Kilimanjaro
The Lemosho Route on Kilimanjaro is considered a moderately-challenging route, suitable for fit beginners and experienced hikers.
Hiking this route typically takes 6 to 8 days, allowing for gradual acclimatization and increasing the chances of a successful summit. A 7-day itinerary offers the best balance of acclimatization and enjoyment.
The descent route for the Lemosho Route is typically the Mweka Route, a rainforest track providing a swift way down from the summit back to a convenient exit point from Kilimanjaro National Park.
The best route to climb Kili depends on your prior experience, your expectations, your fitness level, and your desired experience. Popular routes including Lemosho, Machame, and Rongai are commonly recommended because of their picturesque landscapes and good success rates for the summit.
Lemosho Route is considered one of the easiest routes on Kilimanjaro but it is more challenging than the Marangu route due to the longer itinerary, the need to climb the Barranco Wall, and sleeping in tents rather than huts.
The hardest Kilimanjaro route is often regarded as the Northern Circuit Route due to its longer duration and strenuous sections. The Western Breach route is also one of the most challenging options for the summit.
While you can get some LTE connectivity on Kilimanjaro to receive and send some messages, this is quite limited. It’s best that trekkers assume they won’t have any connection and purchase an inReach if necessary to connect with friends and family.

More Kilimanjaro & Tanzania Adventure Inspiration
I hope that you’ve enjoyed this in-depth guide to climbing Kilimanjaro via the Lemosho Route. While you’re here on my blog, make sure to check out some of my other guides below.
You’ll find tonnes of inspiration for your trip to Tanzania and East Africa. If it’s more Kili inspiration or tips you’re after, you’ll find plenty of that too.
